
How to Take a Screenshot on a Computer: Windows and Mac Shortcuts
Learn how to take a screenshot on a Windows 11/10 PC or Mac. Compare the main shortcuts, steps, save locations, and PixPin capture tools.
 Capture Guides
To pin a screenshot on screen, select an area with PixPin, then press the pin shortcut or click Pin to screen. The screenshot stays visible as a separate pinned image while you work in other windows. PixPin can also pin images from the clipboard or a local image file.
In this guide, pinning an image means keeping it in a movable window on your screen. You can resize it, keep it always on top, or close it. This is different from setting an image as your desktop wallpaper.
Ctrl+1 on Windows or Control+1 on macOS to start a screenshot.Ctrl+2 or Ctrl+T on Windows, or Control+2 or Control+T on macOS. You can also click Pin to screen on the screenshot toolbar.PixPin shortcuts shown with Ctrl on Windows use Control on macOS. File copying still uses the system shortcut for each platform: Ctrl+C on Windows and Command+C on macOS.
For the complete set of resize, opacity, and Mouse Penetration controls, see the Pin feature documentation.
Ctrl+1 on Windows or Control+1 on macOS to start a screenshot.Ctrl+2 or Ctrl+T on Windows, or Control+2 or Control+T on macOS. You can also click Pin to screen on the toolbar.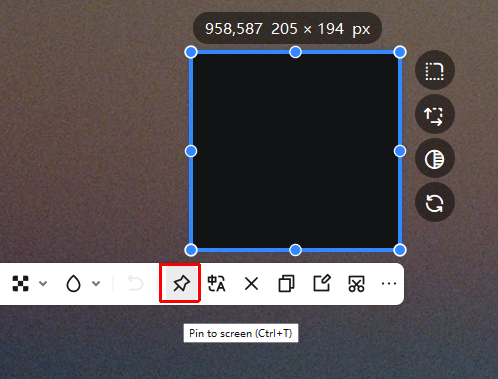 Click Pin to screen on the PixPin screenshot toolbar
The pushpin icon on the screenshot toolbar is the Pin to screen button.
Ctrl+2 or Ctrl+T on Windows, or Control+2 or Control+T on macOS, to pin the clipboard image on screen.You can pin a selected local image directly with a shortcut, or copy the file first and then pin it.
The direct method is recommended:
Alt+~ on Windows or Option+~ on macOS to pin the file directly on screen.You can also copy the file first:
Ctrl+C on Windows or Command+C on macOS to copy the selected image file.Ctrl+2 on Windows or Control+2 on macOS to pin the file on screen.If PixPin is not installed yet, download PixPin, then use any of the methods above to pin a screenshot or image on screen.
Hold the left mouse button and drag to move a pinned image. Use the mouse wheel to resize it.
Press T or toggle Window on top in the pinned image context menu to change whether the screenshot stays always on top. Press Y or toggle Window Shade in the context menu to show or hide the shadow.
Hold the right mouse button and drag over the area you want to display. PixPin switches the pinned image to Thumbnail Mode. This mode does not crop the original image. Hold Shift and drag with the left mouse button to move the visible content within the thumbnail. To crop the image permanently, open the context menu in Thumbnail Mode and select Crop. A cropped image cannot be restored to the original from this view.
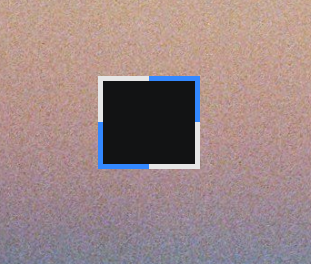 Drag with the right mouse button to select the visible area in PixPin Thumbnail Mode
The blue outline marks the selected area shown in Thumbnail Mode.
Scaling a pinned image to a large size requires CPU processing and may cause some lag. When the pinned image extends beyond the screen, PixPin reduces its scale by default to limit that lag.
An automatically reduced image is not shown at its original quality. To restore the original quality with a mouse, click the middle mouse button to reset the pinned image. On a macOS trackpad, use a two-finger tap.
To stop PixPin from reducing images that extend beyond the screen, go to Configuration > Pin > Auto shrink when Pin is too large and turn the option off. Large pinned images may lag more often when you enlarge them or move them beyond the screen after disabling this option.
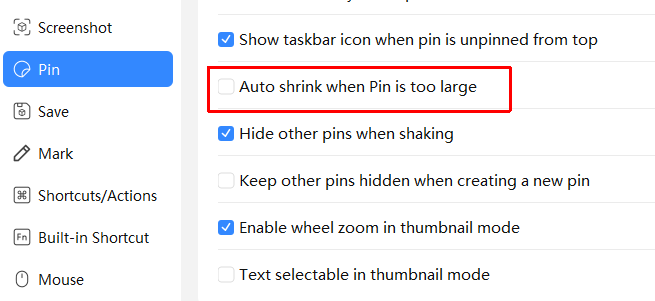 Auto shrink when Pin is too large in PixPin settings
This option is on the Pin page in PixPin Configuration.
When the pinned image has focus, press L or choose Lock from its context menu. A locked image cannot be moved, resized, or have its opacity adjusted, which helps prevent accidental changes.
PixPin treats closing and destroying a pinned image differently. When the pinned image has focus, press Ctrl+W on Windows, Control+W on macOS, or press Esc to close it. Closed images are saved in pin history. Press Ctrl+3 on Windows or Control+3 on macOS to reopen one.
Pressing Ctrl+D on Windows or Control+D on macOS destroys the pinned image. Destroyed images are not added to pin history and cannot be restored from it.
A pinned image is a separate window that you can move, resize, keep always on top, and close. Desktop wallpaper does not move as a separate window.
Pinned images are always on top by default. Activate the image and press T to turn this off. You can also go to Configuration > Pin > Pin window always on top to stop new pinned images from staying on top by default.
Move the pinned image to another position, or turn on Mouse Penetration to interact with content underneath it. The image becomes less opaque by default when Mouse Penetration is enabled. This action has no default shortcut, but you can assign one under Configuration > Shortcuts/Actions.
A closed image can be restored from pin history. A destroyed image cannot be restored.
On Windows and macOS, open Configuration > Shortcuts/Actions or Configuration > Built-in Shortcut to review the related settings.
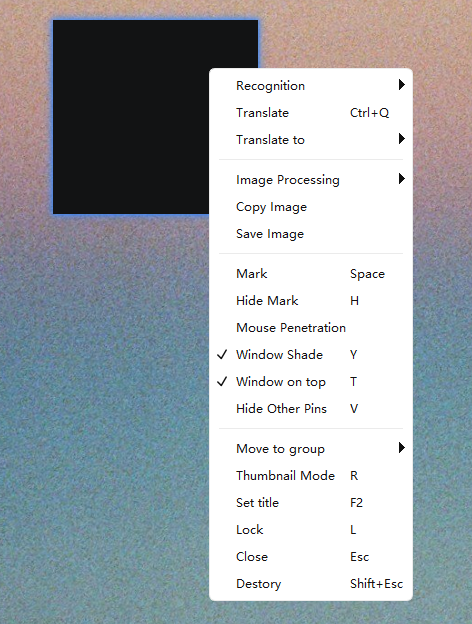 Window on top, Lock, Close, and Destroy in the PixPin pinned image context menu
The pinned image context menu includes always on top, shadow, Mouse Penetration, lock, close, and destroy controls.
PixPin can pin a screenshot, clipboard image, or local image file on your screen. After pinning it, you can move and resize the image, keep the screenshot always on top, use Thumbnail Mode, lock it, or restore a closed image from pin history. Images that extend beyond the screen shrink automatically by default. Reset the pinned image when you need to view it at its original quality.
Related posts
 Capture Guides
Learn how to take a screenshot on a Windows 11/10 PC or Mac. Compare the main shortcuts, steps, save locations, and PixPin capture tools.
 Capture Guides
Learn how to translate a screenshot or text in an image with PixPin on Windows and macOS. This guide covers shortcuts, toolbar and pinned-image methods, translation modes, target languages, and API key setup.
 Capture Guides
Learn how to record a GIF on Windows or Mac with PixPin. Select a screen area, capture your actions, and export a GIF with the right frame rate and quality.